About Time

by Lisa Lombardi in ,


Most people start off the new year with resolutions like "lose weight," "learn to play the guitar," or "kiss more boys" (just me?). I kicked off 2017 with the realization that I've been in my new apartment for almost six months and it was still missing some key elements. It was livable, sure. But was it at its most functional? More importantly, was it in a state where I'd want to have people over?

The looming milestone was enough to finally light a fire under my ass to pull the trigger on some stuff that never felt important enough in the midst of Christmas shopping and anxiety-inducing credit card bills. First things first: it was time to go to IKEA.

It's important to have a game plan before even stepping foot inside the giant warehouse, and this was mine: (1) replace the broken frame that was part of my postcard gallery wall, (2) get a better organization option for my makeup, and (possibly) (3) get some more plants.

#1: got it. #2: accomplished

With the exit in sight, there's where my resolve unraveled. I had tried to resist throwing other stuff into my bag during the long walk through the showroom, but when I spotted the large square option in the Ribba frame series, I knew it'd be a great option for the wall next to the fridge. (The print I had hung originally just looked too dinky.)

And hey, while I was at it, why not snag two more to hang near the closet? They might not be noticeably visible all the time, but open wall space is limited in my apartment, so I want to take advantage wherever I can. I hobbled to the cash register with three more Ribbas than planned.

So, now that I got these frames, I needed something to put in them. After polling friends and family, I landed on these three faves from my travels:

Pictured Rocks National Lakeshore

Pictured Rocks National Lakeshore

Bryce Canyon

Bryce Canyon

Glacier National Park

Glacier National Park

I compared a few options, but ultimately went with prints from Walgreens (CVS, Snapfish, and Target were also in the running), and I was very pleased with how they turned out.

Trying to narrow down my favorite photos to just these three reminded of how many great shots I had that I also wanted to be able to display. I toyed with the idea of getting three or four smaller frames to perch on the ledge by my stairs, but worried that they'd look crowded and bulky.

One of my coworkers had some prints from Artifact Uprising and Parabo Press on her desk, and I really liked the square format on thicker paper, complete with a white border. This style would allow me to show off photos without necessarily needing to frame them, so it seemed like the perfect solution. I ordered from Parabo Press because they were running a promotion that allowed me to get 25 larger-format prints for just $5, plus shipping. Sold.

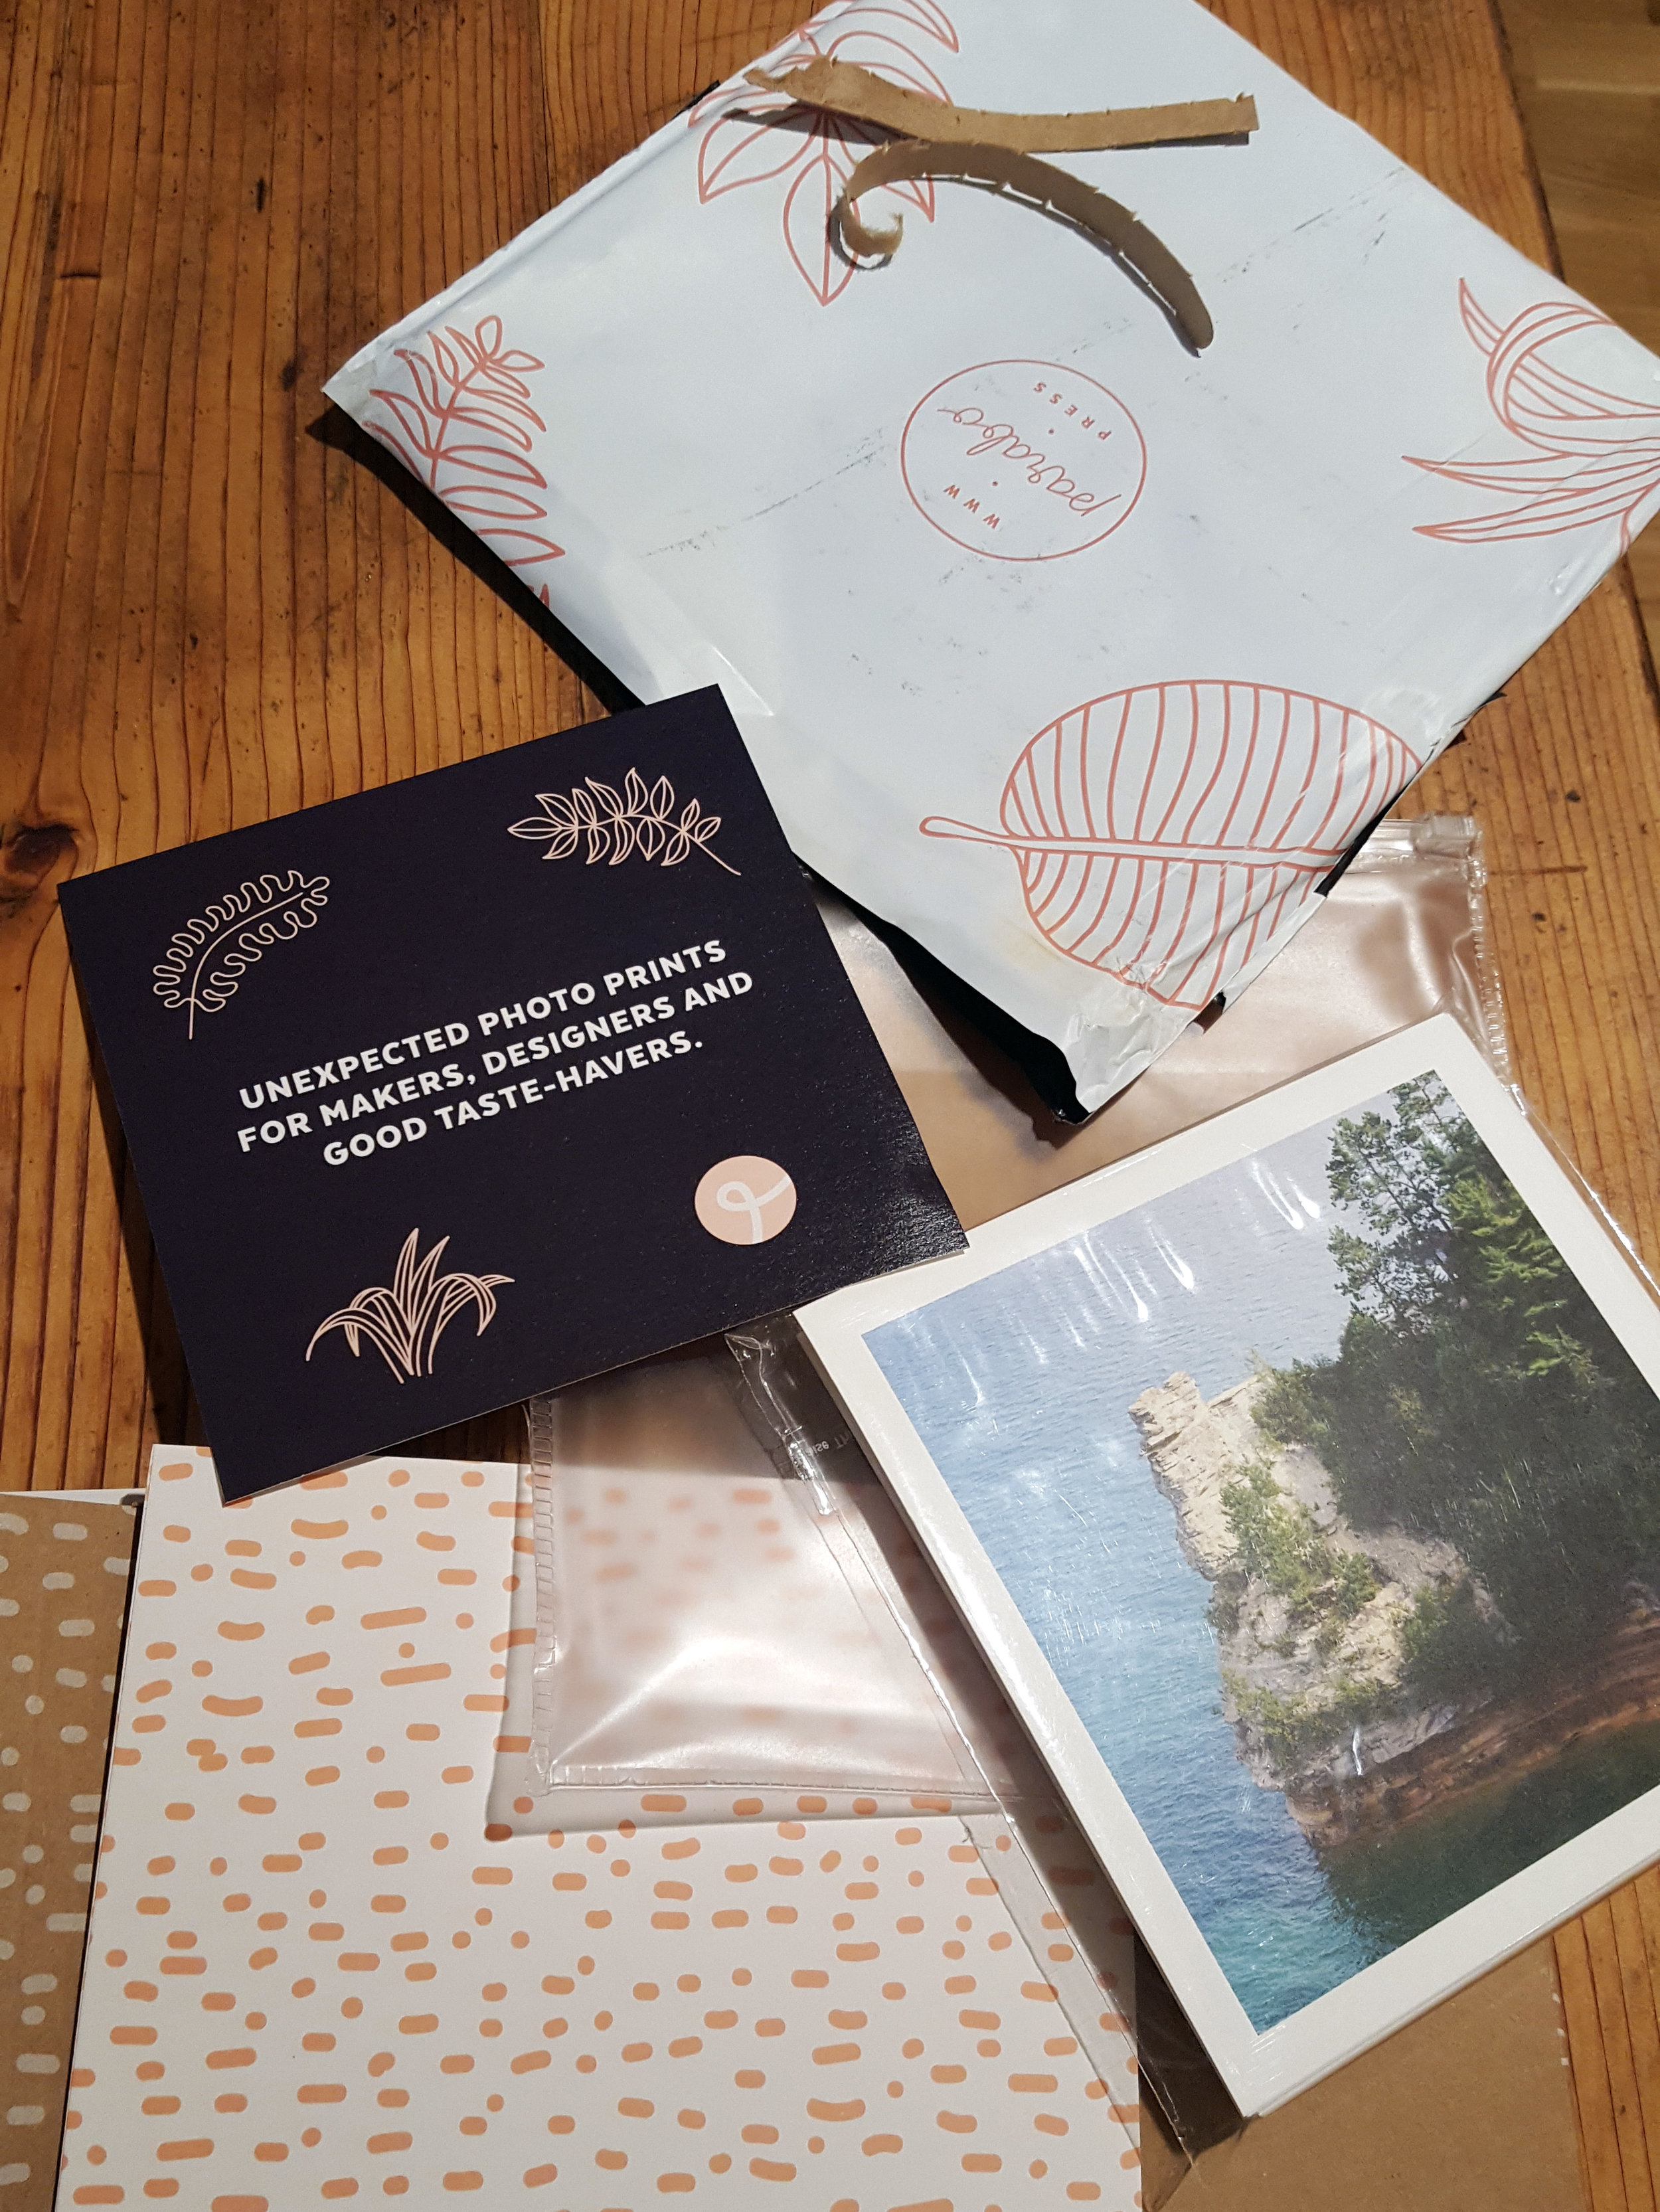
Based on the quality of photos that I received (along with the thoughtful packaging job), I'd highly recommend trying Parabo Press, especially if you have some favorite Instagram pics you want to print. 

Now that I had the prints, the remaining issue was: how to display them? 

I had this idea to make a little ledge that would prop up several photos at a time, but wasn't exactly sure how to pull this off. During a little Friday night visit to the Home Depot (isn't that how everyone spends their Friday night?), I saw my solution: two squared-off dowels and a narrow strip of wood cut down to size.

The dowels were about three feet long, which fit my space perfectly, and I used the in-store saw to cut down the wooden strip to match. At home, I applied some stain I had, and then glued the dowels to the wooden strip, which acted as the base. All done, I had a thin opening between the two dowels that allowed the photos to easily rest upright. Total cost? Probably less than $5, assuming you have glue and stain on hand (or don't care about staining).

Last on my list of frenzied updates was based on a suggestion from my mom. While visiting, she mentioned that a shelf in the bathroom might be a nice addition, and I was getting sick of moving my makeup tray every time I needed to throw laundry in the hamper, so I started to think maybe she was onto something.

While I was at Home Depot, I wandered to the lumber section and started chatting with my new best friend, Chet. I described my project, and stressed how little wood I needed and that I'd be interested in the cheapest option possible. He found me a damaged board that was completely fine on one end — one that he wouldn't be able to sell as-is — and cut off the end for me. I think I was only charged a couple bucks for it.

This brings me to my hardware store lesson #2 (number one is always bring your own measuring tape): don't be afraid to talk to the people who work there. There are a lot of idiots who won't know anything, but there will always be at least one or two gems who will go out of their way to help you out.

I picked up two metal brackets that looked cool, brought home my piece of wood, sanded and stained it, and then I was ready. Time to hang it. 

Just one problem: the "cool design" of the brackets made one of the screw holes near impossible to access, and the instructions on the back were nothing but (inaccurate) pictures. (Give me words, people!)

So, I did what I always do when faced with a puzzling dilemma: I called my dad.

While we were chatting, I had a revelation and figured out the bracket problem, so my dad moved on to trying to tell me how to go about screwing the holes.

Whoa, whoa, whoa, father. Let's put a pause on the mansplaining here. I know what an anchor is. I know how to use an electric drill.

"Okay, but when you're drilling into the board itself, you want to be careful or else you'll go all the way through, so you should —" he tried to tell me.

"— put a piece of tape on the drill bit to indicate just how far I should drill. I know, I know," I said. "Dad, do you know who you're talking to, here? I'm Lisa freakin' Lombardi, man."

I'm don't think he'd ever been more proud.

It's totally true that the small victories are just as important as the big ones.


PSA: Watco Danish Oil is the Shit.

by Lisa Lombardi in , ,


We've already established that I've been a regular Craigslisting fiend lately, but what I skimmed over in my last post is the fact that these finds usually don't arrive in pristine condition.

Take my glorious, beautiful chairs. General Assembly, a company here in Boston that hosts professional development classes (think stuff about online marketing, coding, engineering, etc.), was moving their offices and needed to unload 14 of these puppies, so I jumped on the opportunity. However, due to some crazy planning on my part, I wasn't able to pick up my four until the last available day.

Translation: I got the ones that no one else wanted.

That's not to say that I regret my decision, but I did feel a little knot of worry when I was loading them into the car. There were some fairly noticeable scratches and gouges in the wood, and one had a particularly dark stain on the woven seat. But how much can you complain when you're getting something for reportedly 10% of the original price?

Deep breaths. I could fix this.

You know how when you first move out on your own and really start cooking for yourself, you realize that recipes call for all these spices and seasonings? And that stuff is actually really freaking expensive? It sucks buying everything for the first time, but then you're pretty much set for the next 5-10 years. (I cook pretty exclusively with paprika, garlic powder, and cinnamon. Everything else is virtually untouched.) (Don't be me. Throw away your spices after like, a year.)

Anyway, that's how it is when you first start building an arsenal of tools and magical potions acquired from the Home Depot. Luckily, I've already dipped my toes in that water and had some handy things already waiting in the closet to come to my aid. Namely: steel wool, Murphy Clean & Shine for wood furniture, and Watco Danish Oil in natural.

A little elbow grease, a little actual grease, and some oil later, and my chairs were looking pretty great. The scuffs buffed out and those ugly scrapes and gouges? Completely filled in by the oil.

All that was left was the stain.

I threw everything I had at it. Oxyclean. Mineral spirits. Nail polish remover. (I'm pretty sure it's paint.) And while I'm still not convinced there isn't more I can try, I'm pretty pleased with how far it's come.

Plus, I plan on either have it tucked in under a table or draped with a throw blanket the majority of the time anyway, so I'm not too disappointed.

I officially have seating for six now! Whoo! Party at my place. Except not, because the only kinds of parties I like are parties I can leave at any moment.


Thrift Store Impulse Buys and Other Saturday Adventures

by Lisa Lombardi in ,


As part of my New Year's resolution to stop over-thinking everything, I got up bright and early last Saturday and left the apartment on a mission. My first stop was Winmil Fabrics, in the Chinatown/Downtown Crossing area.

(Does anyone other than ambitious tourists actually venture downtown before noon on the weekends? It was eerily deserted at 11 a.m.)

My thorough research showed that Boston has basically one fabric store within the city limits (i.e. accessible to us carless people), and this is it. I'm sorry to report that it was as dingy and unimpressive as the outside suggested. To be fair, it had the kind of selection that fourth-grade-sewing-class-Lisa would have been all over: cotton/polyester with busy patterns in bright colors — pretty much everything you'd want for that reversible vest that you definitely wore in public on several separate occasions.

Ahem. Unfortunately, this did not fit present-day-Lisa's needs. Disappointing. This strike-out pretty much solidified what I had feared: I was going to have to order my fabric online.

Ordinarily, I prefer to do my shopping online. However, as someone who works in the online retail industry, I know firsthand just how unreliable product photographs can be, and fabric is especially finicky. But I was reading Rosa Beltran's blog when she mentioned that she buys a lot of the fabric for her projects from Fabric.com because they offer free returns within 30 days of purchase, so it's essentially a risk-free way to try a bunch of different options.

WHAT. This is kind of mind-blowing, because when you order fabric yardage, you're making a cut in the bolt that can't be undone. So, unless someone else wants the exact same fabric for the exact same length or less, the store is pretty screwed trying to re-sell it. I don't know how Fabric.com functions with this policy, but it was enough to convince me to just go ahead and order something already. (2015! New year! Cut the crap!)

Next stop: Michael's, to burn through the shiny new gift card I got for Christmas. There's no better way to celebrate the birth of Christ than by purchasing multiple cans of spray paint, right?

On my way home, I made a stop at Cheap Chic, a thrift store in Allston. I think a more accurate name would be Sometimes Cheap, Rarely Chic, but it's one of Nathan's go-to places for apartment stuff, so I figured I would give it a try. I was originally on the lookout for a mirror but an accent table caught my eye instead.

Remember this? Furniture shame incarnate?

Oof.

Do not stare directly into its depths.

So, this table, down in the basement depths of Cheap Chic, caught my eye. It seemed like the right measurements for that corner of the living room, and there was something about the shape and details that I really dug. I'll admit, I waffled for a bit, walking endless circles around the piles of furniture while I had an inner debate.

No. Cut the crap. I bought it, and even haggled the price down a bit to make me feel better. I then proceeded to carry it home three-quarters of a mile. (Bet you didn't know that thrifting could be such a great arm workout.)

That's the angle that sold me on it. But it's not without its problem areas...

Part of the decorative molding was ripped off one side, which I hadn't noticed at the store. Perhaps I was too quick to pull the trigger? Oh, irony.

The top, I knew, sported the most damage. I'm not concerned about the middle portion, since that will be covered by the stereo and record player. But I'll have to try out a few things for the edges. So far, rubbing coffee grounds into the scuffs and scratches has not worked, and something tells me that the other at-home remedies I've seen won't make a difference either. Maybe a scratch correcting marker from the hardware store?

Or maybe I'll paint it. As much as I enjoy the little inlaid jazziness going on at the top, I'm tempted to cover the whole thing in a fresh coat of...deep navy? With faux brass end caps on the legs and the metalwork coated in brassy paint? Who knows. Weigh in with your thoughts, please.

For now, I've opted to just live with it, as is, and hold off on any paint-related solutions until it gets warmer out and I can once again use the balcony for my more fume-y projects. 

The cord situation kind of kills me, but it's not like it was much better before. Maybe I'll try wrapping that bundle in black electrical tape, just to wrangle and camouflage it a bit better.

Now. About that spray paint...


Project: Dining Chairs

by Lisa Lombardi in ,


Remember that chair I mentioned last time? The one I got for the back balcony that ended up destroying hours and hours of my life because I foolishly refused to give up on it?

It looks like chairs are my kryptonite.

Back when I had an alert set up for "dining chairs" on Craigslist, I got an email with an ad for four of these, for FREE. Right price? Check. And there's something about the style that I think is just so cool. I have no idea what that style is, but I like it. (As far as I can tell, "that" style does not exist.)

The seats are going to get recovered so I can finally try my hand at upholstering, and at first, the plan was to leave it at that. I was going to just clean up the wood a bit and focus my efforts on the seats. But then they sat around in my dining room for a week, and the darker wood didn't look right with any of the patterns and colors I was leaning toward. And even after I wiped them down with some Murphy's, there was still this gross waxy film that I didn't want to think too hard about. And I wasn't loving how the finish of the chairs went with the wood floor and the wood paneling on the walls.

And then I wondered: what if I sanded down the current finish and redid it? They're always doing it on HGTV shows and Apartment Therapy and all over the interwebs, so why couldn't I? So I sanded a small part on the underside of one of the chairs, just to see what it would look like.

I loved it. I loved it just as it was, lighter and more casual and soft to the touch. It reminded me of driftwood, and would look amazing with a colorful tribal pattern or something a little more boho.

Before I knew what I was doing, I had started sanding the top side of the chair, merrily going along my way. Sanding. And sanding. And sanding. Twenty minutes passed, and I remembered something: I HATE sanding. The sound is grating and gives me goosebumps and it's slow and it makes a big mess and it's SLOW.

I broke out the power sander, sure that it would be my savior. But after only another twenty minutes or so, I had to stop because I couldn't feel my hands anymore.

These four chairs have been sitting in the dining room for MONTHS now. Every time I try to get a little more work done, I don't last more than an hour before I have to give up again, and I'm left covered in sawdust, ears ringing, hands still vibrating.

I don't know what to do. I still really like the chairs. And a recent compliment from Andy's aunt confirmed that they are, actually, really nice. But I can't keep letting this project drag. The dining room — which, in my defense, barely got used to begin with — is now a wreck of sandpaper, rags, power tools, and unusable space. It's the only common room in the apartment left that I haven't fixed up yet, and I was really hoping to get the ball rolling with these chairs.

But, guys. The SANDING. It's killing me.

What do I do? Give in and junk them? Stick with it? Anyone know some tricks to make sanding less painful? I'm thinking of trying a chemical stripper, but they sound kind of scary. Help!